> For the complete documentation index, see [llms.txt](https://verify-doc.tiller-verify.com/llms.txt). Markdown versions of documentation pages are available by appending `.md` to page URLs; this page is available as [Markdown](https://verify-doc.tiller-verify.com/training-hub/user-guides/applications/post-completion-actions.md).
# Post-Completion Actions
Even after a mobile user has completed their verification journey, Verify Portal users can continue to take further actions within the Verify platform. This includes requesting additional information, such as new forms or uploading additional documents, when further clarification is required from the client. You can also reset the Identity & Liveness check if it remains in **"In Review"** status, allowing the client to resubmit their verification through the mobile app.
These features allow you to manage the process efficiently within a single platform, avoiding the need for back-and-forth communication via email. All updates and requests are captured within the same record, ensuring consistency and ease of access.
***
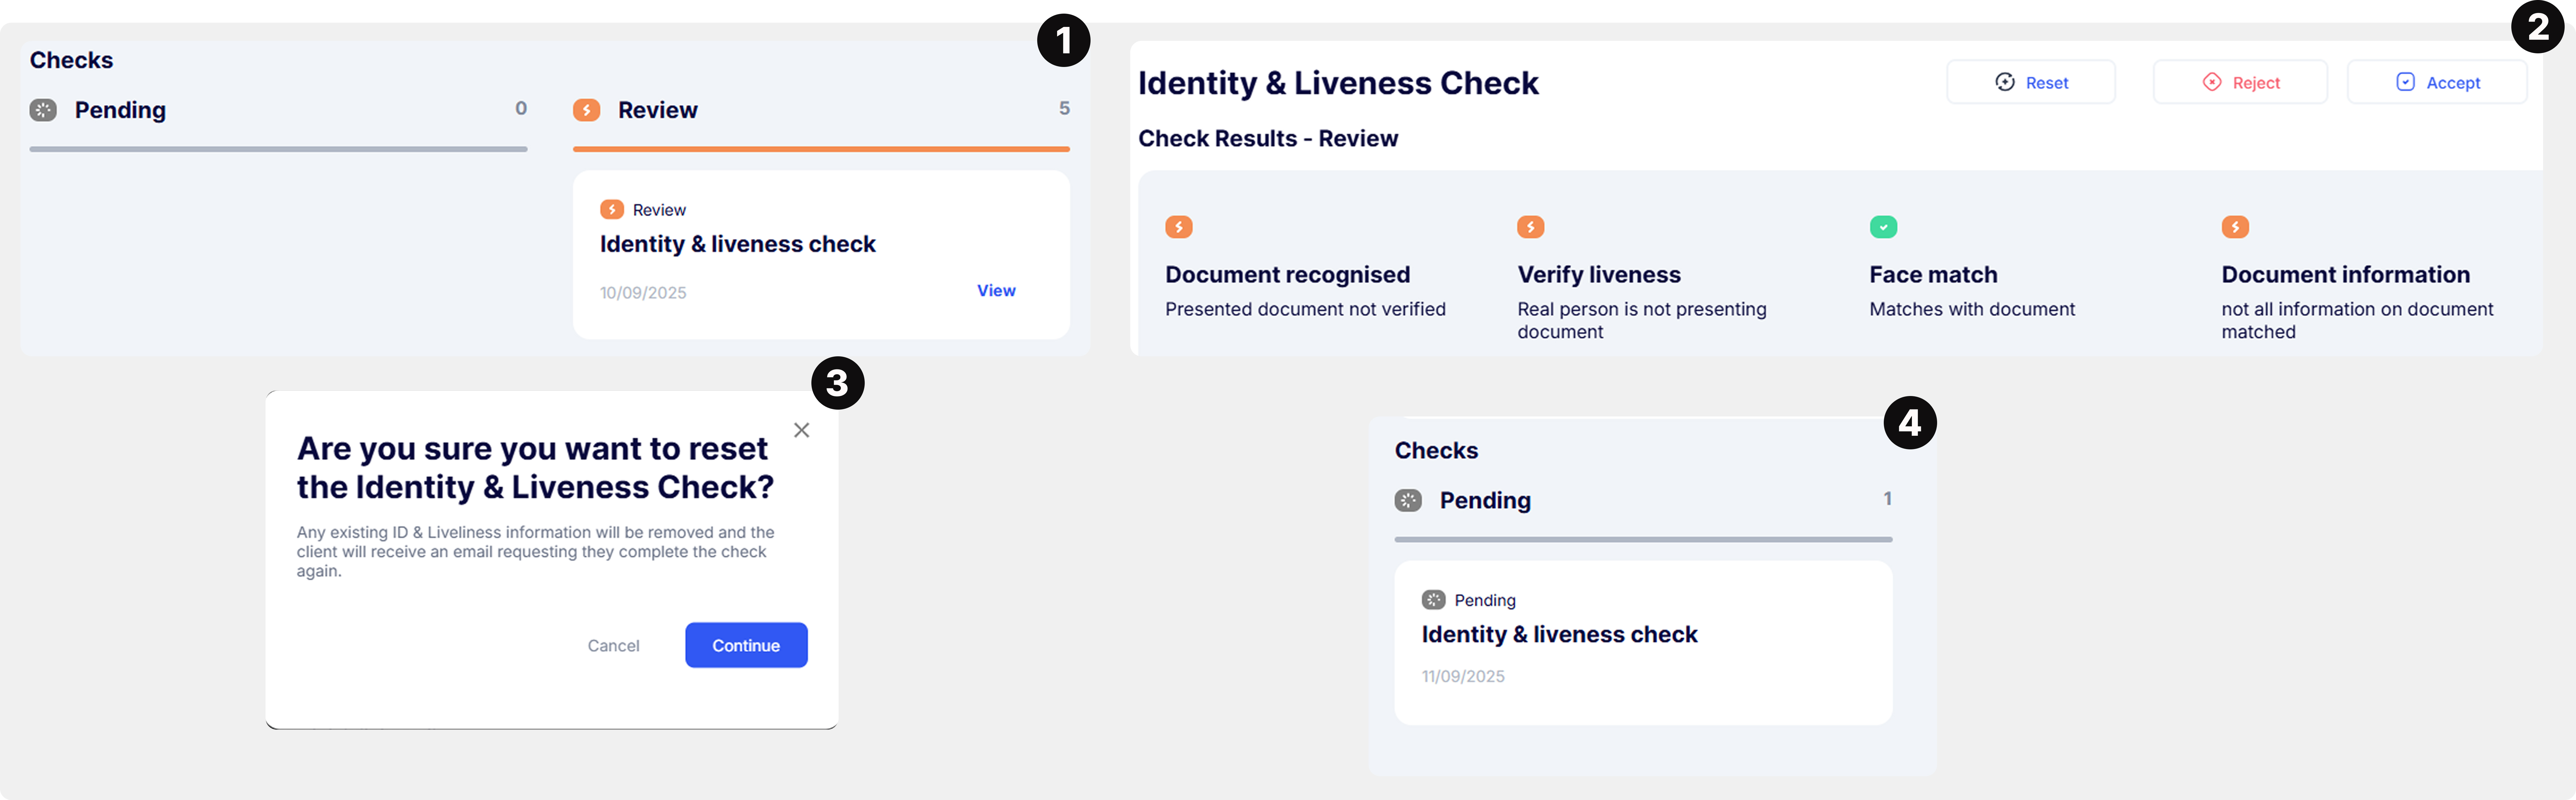
### Reset Identity & Liveness (ID\&V) Check:
The **Reset Identity & Liveness Check** feature allows Portal users to selectively reset the ID\&V process for individual applicants directly within the Verify Portal. This is especially useful when an ID\&V check is in **"In Review"** status due to issues such as:
* Blurry or poor-quality ID photos
* Incomplete or mismatched identity data
* Failed liveness or facial recognition checks
Rather than restarting the entire application or communicating with the client via email, this feature enables you to manage the process within the platform. It ensures a smooth and auditable workflow while maintaining a single record of all client verification actions.
**Step-by-Step: How to Reset the ID\&V Check**
Step 1: Access the Individual Application
* Go to the **Verify Portal** and open the relevant participant’s application.
* Navigate to the **Individual Check Overview** card.
Step 2: Go to the ID&V Check Card
* Go to the **Identity & Liveness Result** card and click the **View** link.
* If the check status is **"In Review"**, a **"Reset ID\&V"** button will appear next to it.
Step 3: Click the "Reset ID&V" Button
* Click the button to start the reset process. A confirmation pop-up will appear with the message: "*Are you sure you want to reset this client's Identity & Liveness check?”*
* Click **Continue t**o proceed.
* The Identity & Liveness card will reflect the reset status (e.g. with a pending or reset icon). Verify system will send an automatic email to the client with the new invite code and instructions to re-complete the ID\&V step via the mobile app.
Reset the ID&V Check
***
### Request Additional Documents Post-Completion
Even after a mobile user has completed their initial verification journey, Verify Portal users can request additional documents as needed directly from within the Verify platform. This feature is useful when further supporting evidence is required, for example, proof of wealth or other documents relevant to the application type.
The process ensures that all requests and uploads are stored in a centralised location, eliminating the need for external communication and maintaining a complete record within the platform.
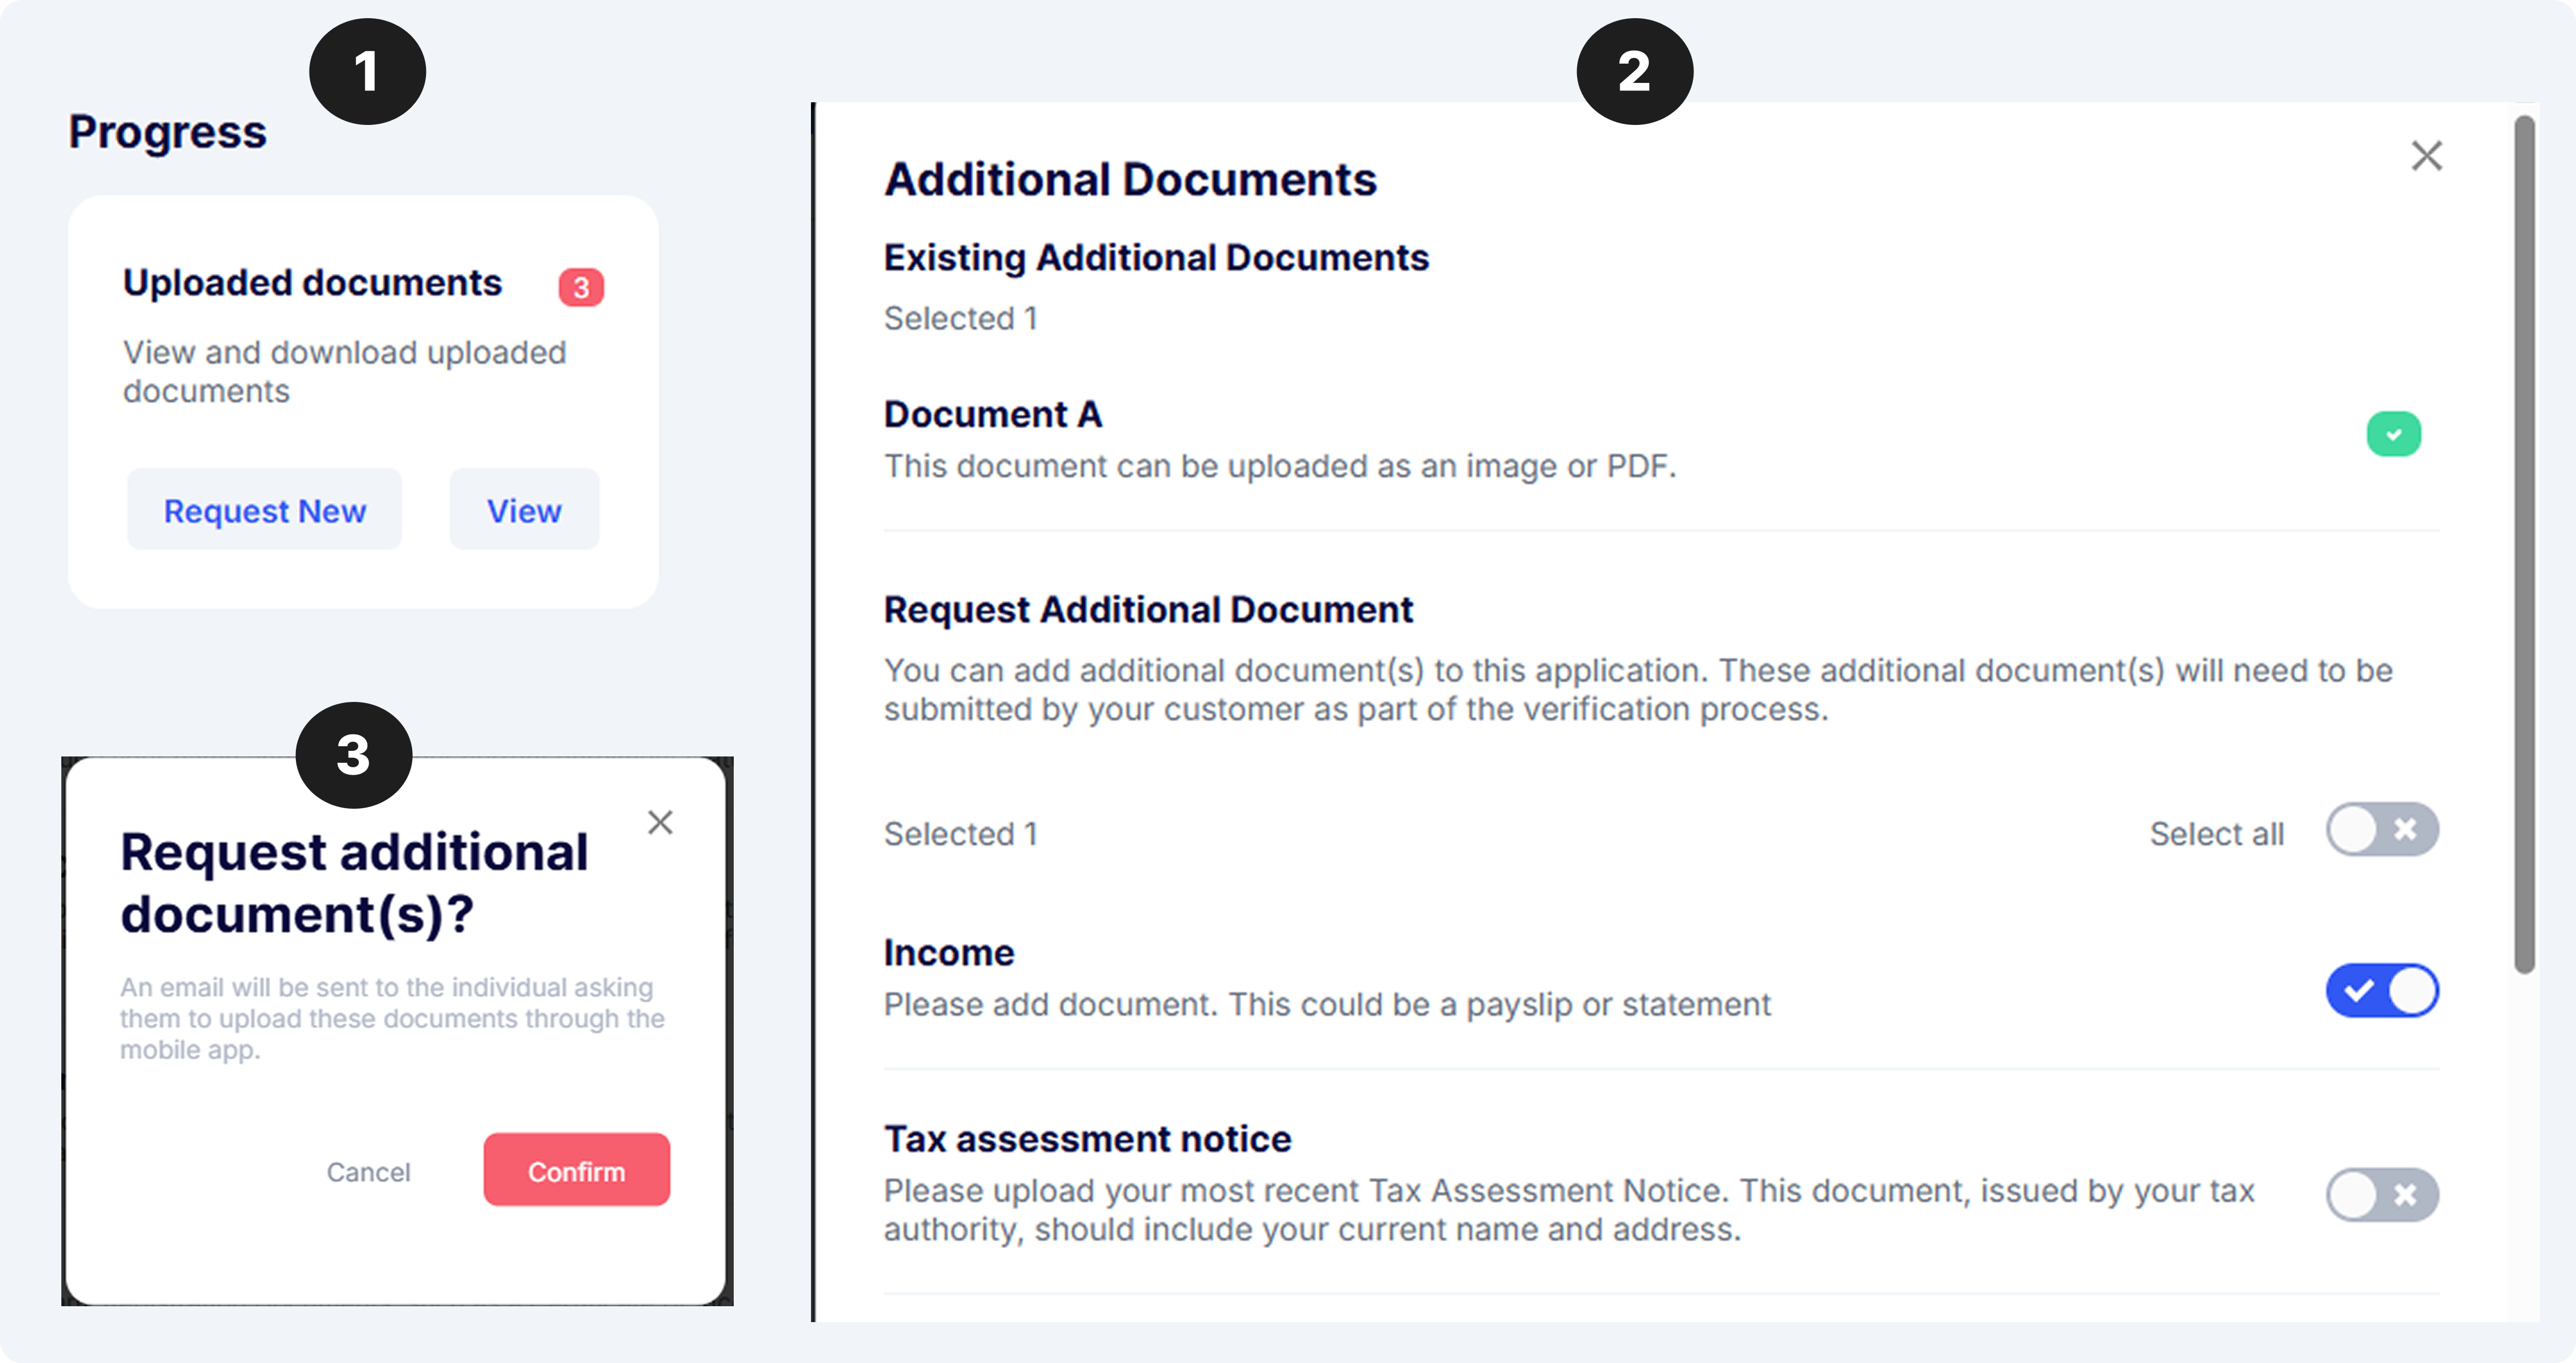
**Step-by-Step: How to Request Additional Documents**
Step 1: Navigate to the Individual Application
* Open the relevant application in the Verify Portal and go to the “Progress” section.
* Under the uploaded Documents section, click the “Request new” button.
Step 2: Select Documents
* A list of available additional documents will appear.
* The screen shows two sections:
* **Existing Additional Documents**: Already assigned to the application.
* **Add New Additional Documents**: A list of additional documents available for assignment.
* Toggle the switches for the documents you wish to request
* Click “Add”, then “Confirm” to proceed.
Step 3: Automatic Notification & Status Update
* The selected document requests are sent to the mobile user with their invite code and instructions.
* The new document status appears as "Pending" in the Portal action section.
Request Additional Documents
{% hint style="info" %}
When the mobile user reopens the mobile app and enters their invite code, they will see the pending document requests.
After uploading, the document status updates to “Completed” and can be downloaded in the Portal.
{% endhint %}
***
### Request Additional Forms Post-Completion
The Verify platform now supports assigning **additional forms** to applicants **even after** they have completed their initial journey. This allows you to collect any extra details directly through the app, keeping the process streamlined and all records centralised within the platform.
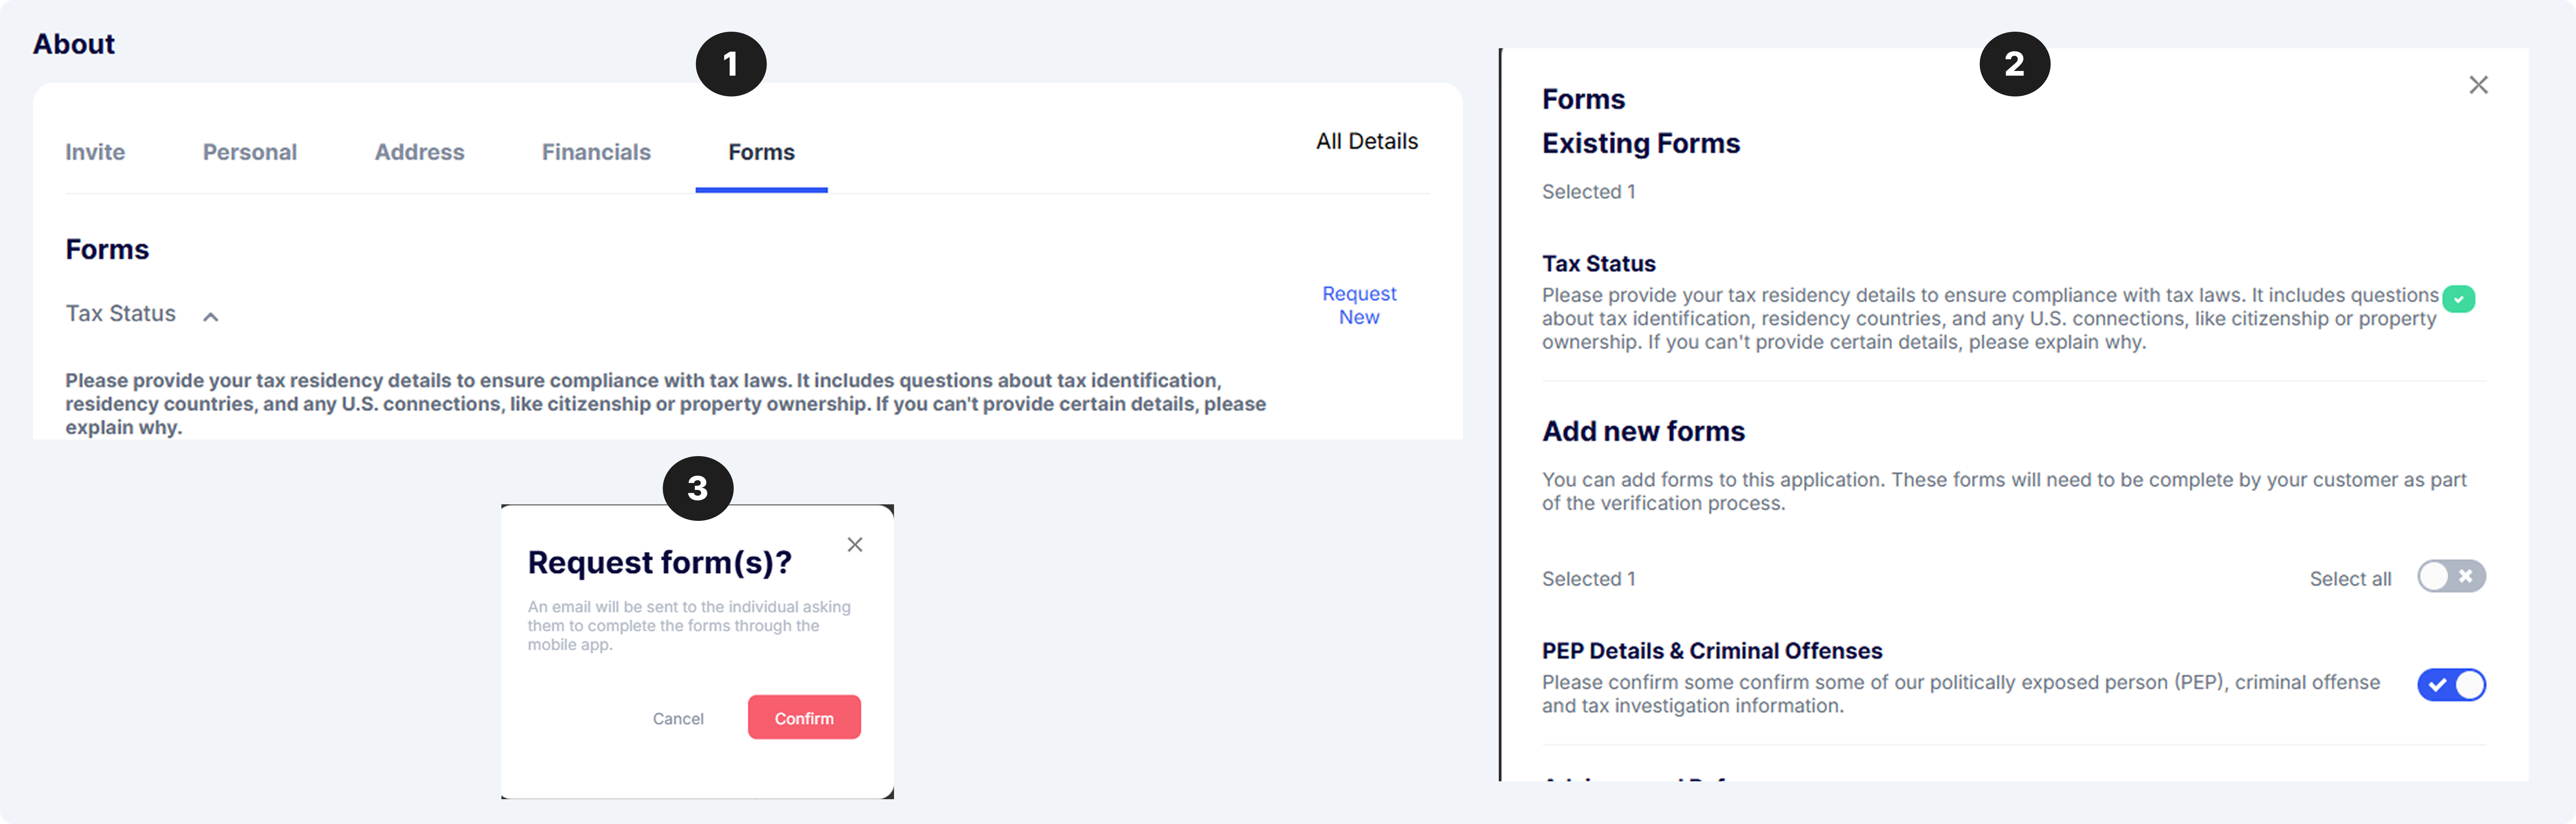
**Step-by-Step: How to Request Additional Forms**
Step 1: Navigate to the Forms Tab
1. Open the relevant application in the Verify Portal and go to the **"About"** section. Click on the **"Forms"** tab, where all form-related actions are managed.
Step 2: Click "Request Now"
* A new **"Request Now"** button is available within the Forms tab. Click it to open the **Form Assignment** screen.
* The screen shows two sections:
* **Existing Forms**: Already assigned to the application.
* **Add New Forms**: A list of additional forms available for assignment.
* Use the toggle switches to select the forms you want to send.
* Click “Add”, then “Confirm” to proceed.
Step 3: Automatic Notification & Status Update
* The selected forms are added to the user’s application.
* An **email notification** is automatically sent to the user with instructions.
* A new form action is created in the progress action section, with each form's status marked as **"Pending.**
Request Additional Forms
---
# Agent Instructions
This documentation is published with GitBook. GitBook is the documentation platform designed so that both humans and AI agents can read, navigate, and reason over technical content effectively. Learn more at gitbook.com.
## Querying This Documentation
If you need additional information that is not directly available in this page, you can query the documentation by asking a question.
Perform an HTTP GET request on the following URL with the `ask` and `goal` query parameters:
```
GET https://verify-doc.tiller-verify.com/training-hub/user-guides/applications/post-completion-actions.md?ask=&goal=
```
`ask` is the immediate question: it should be specific, self-contained, and written in natural language.
`goal` is what the user is ultimately trying to achieve, the reason they need the answer. Sharing it helps GitBook give you a better, more relevant answer. A goal is most helpful when it describes the outcome the user wants rather than restating the question. For example, with `ask=how do I create an API token`, a goal like `automate deployments from our CI pipeline` lets GitBook tailor the answer to that use case.
The response will contain a direct answer to the question and relevant excerpts and sources from the documentation.
Use this mechanism when the answer is not explicitly present in the current page, you need clarification or additional context, or you want to retrieve related documentation sections.