
Getting Started
How to set up your Verify by Tiller account.
Get started by signing up within the Verify Portal: https://app.tiller-verify.com/sign-up
For more information, please follow these 4 steps:
Step 1: Set up your account
To begin, sign up for Verify by Tiller by visiting the following link: Sign Up
Fill out your user and company information. After successful registration, Tiller will then activate your account and send you a welcome email.
You will then be able to log in: Login
If you have any question during your account set up please contact our customer support team: [email protected]
Step 2: Invite team members
Admin users can invite team members through the settings area: 
Within the setting area click on the 'Users' tab:

From here you can manage and invite new users:

Please complete the form by adding their name, email, job title and permissions.
Admin - Has access to the settings areas. Can manage company and user information.
Staff - Do not have access to the settings area.
Once complete, click the 'Send Invite' button. The user will receive an email asking them to set up their password to access the Verify Portal.
Step 3: Create your first application
You can create your first application from the applications overview screen: 
Create a new application by clicking on this button:

You will then need to complete a short workflow: Create application >> Add Individuals >> Send Invites.
Create application:
Create a new application by adding an application reference, selecting the application type and adding a consultant.
Application reference: This is your reference to identify and search for this application.
Application type: This will determine which checks will be performed against the individuals.
Consultant: The details of the professional or consultant, this is usually the person with the relationship with the customer. This is different to the Verify Portal user.
Add individuals:
Add one or more individuals to the application. They will all be grouped under this application. We need some basic information to set up their record:
Title
Gender - Use 'Other' if unknown or unspecified.
First name
Middle name(s) - Optional
Last name
Date of birth - Optional
Email address - For sending the invite. Try to use a unique email for each person.
This will create a record for each individual under this application. If you stop the process here, the application will be in a 'New' status, and you can add more individuals and send invites later.
Send invite(s)
Once you have added all the individuals, you can send the invitations. 
Each individual will receive an email asking them to complete the process using the Verify mobile app.
Once the invites are sent, the application will have an 'In progress' status. The application will move to the 'Review' or 'Complete' state once all individuals have completed the process on the mobile app.
Step 4: Managing your applications
Applications Overview
Manage the progress of your applications from the applications screen:
The applications can be viewed in either a card or table view:

Within these views, each application will have a status.
New >> In Progress >> In Review >> Completed / Rejected
⚪New - The application has been created, but invites to individuals have not been sent.
🔵In progress - The email invites have been sent to participants but not everyone has completed their mobile app actions.
🟠In review - All individuals have completed the Verify App process, but at least one check needs to be reviewed.
🟢Completed - All checks have been successful, or an 'In review' application has been manually completed.
🔴Rejected - The user has rejected an 'In review' application. This status is to help manage applications that have been unsuccessful.
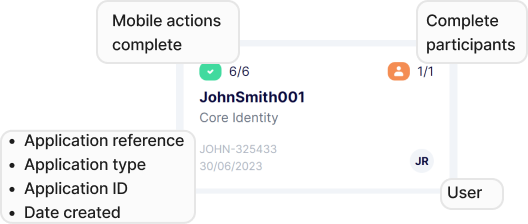
The application card has some key information:
You can search and filter the applications.
Search: The application can be searched using the reference, ID and participants’ names.
Filter: The applications can be filtered by user, consultant, created date, application type and whether the application has been archived.
Select an application you wish to view from this page.
View application
The application view page shows key information about the application and participants associated with it. This includes general details about the application, the count of checks and their status, and the participants associated with it. ‘In review’ applications can be 'completed' or 'rejected'.
The application view page shows key information about the application and participants associated with it. This includes general details about the application, the count of checks and their status, and the participants associated with it. ‘In review’ application can be completed or rejected from this view.
Application Details: In this section, you will discover comprehensive details about the application type, its creation date, the unique ID specific to this application, and the assigned consultant. Furthermore, a deletion date is included in accordance with our data retention policy, serving as a reminder that this application is scheduled for automatic removal on that particular date.
Checks In Review / Passed / Pending: This displays the total number of checks for each participant in the application and their status.
Participant Details: Each participant will have a card where the user can view some information of each participant, including their name, actions completed, checks passed, and checks in review. Click on the participants’ cards to view their verification results.
The application view page contains actions the user can perform to manage the application:
Choose Participant to View: Users can select a specific participant to view their progress and the results of their checks in more detail.
Add Participants (In progress status only): While an application is in progress, users can add additional participants and send them an invite.
Complete/Reject Application (In review status only): Once an application is in review, users can mark it as complete or reject it based on the results of the checks and any additional information gathered. Completing or rejecting the application will change its status.
Update User: The user assigned to the application can be updated.
Update Consultant: Users can assign or change the consultant responsible for managing the clients.
Archive Application: Users can archive an application to remove it from the active list, while retaining the information for future reference it will no longer appear within the applications page without filtering for archived applications.
Delete Application: Users can permanently delete an application and all associated application and participant data, ensuring that sensitive information is permanently removed.
Comment: Users can add comments to an application.
You can view each individual from this application by selecting their card.
View Participant
The participant page provides an in-depth view of individual information, progress tracking, and the outcomes of their checks. You can delve into the specifics of check status and review the result information.
Checks in ‘Review’ can be manually accepted or rejected of checks as part of the review process.
On the participant page, users can access the following information:
Progress Section: The customer's progress can be monitored from this section. You can
View uploaded documents and request new additional document uploads.
Track invite status, including the invite email address and time sent.
Resend the invitation if required.
Monitor action progress (e.g. Accept Terms, Add Personal Details, Perform ID Check, etc.). Once all actions are marked as completed, checks will begin processing.
About Section
The About tab in the centre panel provides a comprehensive view of the participant’s information, organised into several sub-tabs:
Invite Tab: Displays the initial details entered when creating the participant's application, such as title, name, and gender.
Personal Information Tab: Shows the personal details submitted by the client via the mobile application. This includes information such as full name, nationality, and place of birth.
Address Tab: Displays the current and previous addresses, along with geolocation data, as provided by the client through the app.
Financials Tab: If applicable to the application type, this section presents financial information such as bank account details, source of funds, employment status, and income.
Forms Tab: Lists any forms completed by the client, including the questions asked and their responses. You can also request a new form if additional information is needed.
To view all information in one place, click the "All Details" button. This will display a consolidated view of the information from all the sub-tabs, including Invite, Personal, Address, Financials, and Forms, in a single screen for easier review.
Check Information
Checks are divided into three distinct stages: "Pending," "Reviewed," and "Completed," providing you with a more comprehensive understanding of their statuses.
Each check is presented in a card format, containing key information and icons that convey the status and result of the check. To access more detailed information, users can click on the "View" option on the card. This action will display detailed check information. It's important to note that this "View" option is available only for checks that have been completed and are presently under review.
Manual Accept/ Reject Check
Users can manually accept or reject checks in the 'review' status. When users choose to manually reject or accept checks, these actions will be stored against the check details. Users will be prompted to leave a comment explaining the reason for this decision. This note will be included in the Customer PDF Report for audit purposes.
Further actions
Users can also complete the following actions against the participant:
Reset Individual: Reset the participant's progress. This will remove all collected details and check results on the customer, enabling them to start the verification process from the beginning.
Delete Individual: Permanently remove the participant and all their associated personal and verification data.
Add Comment: Add notes or comments about the participant, fostering communication and collaboration among team members.
Download Customer Report PDF: When the customer has completed their mobile actions and their checks have been performed, a comprehensive PDF report of the participant's KYC checks which can be downloaded and saved for record-keeping purposes.
Post-Completion Actions
This section outlines the available post-completion controls for Portal users within the Verify platform.
Once a mobile user has completed their verification journey, Portal users can still take further actions if needed. These include:
Requesting Additional Information: You can request new forms or upload additional documents, even after the application is marked as complete. This is useful when further clarification or supporting evidence is required.
Resetting Identity & Liveness Checks: If the Identity & Liveness check is in "In Review" status and needs to be redone (e.g. due to image quality issues or mismatched data), you can reset this specific check without affecting the rest of the application. This allows the user to resubmit their identity verification through the mobile app.
These tools provide flexibility and ensure that applications can still be updated or corrected after initial submission.
Last updated